Scenario 1: Concerning the Rebellion of Odawal
Post here if you want to play!
Being a detailed description of the first battle, told by Morod the Red, a priest and historian of Brahmu.
In the 400th Year of the Pharaoh there was rebellion in Odawal. I was there the summer before, and saw with my own eyes the indulgent pleasures that had befallen the city. The Odawalites have a little bit of civilized learning in them, which rivals all of the better cities in Hikuptah, but they have suffered long from the same vice that plagues all Hikuptans: the Odawalites confuse nobility with pampering, and dilute their good traits by always chasing after this perfume or that gilded chariot. I have seen one man beating his breast in the street because another man took one of his finer robes in a dice game, even though he still wore a robe which I could see was more expensive than the one he lost. I offered him my own robe and a clap on the ear, but he only spat at my feet and left to beat his breast somewhere else.
Because of this vice, the people of Odawal became wretched, and were like dogs snapping at the heels of sheep and begging their master for scraps of food. This means that the sheep are the pious people and priests, and the master is Wohahat, where every person in Odawal wishes he lived. The temples were without offerings, except when someone took a rich calf and said, 'Look, I am giving this rich calf for the offering.' The worst offence, however, came on the third holy day of the year, when the High Priest went with his slave to buy new clothes instead of beginning the day's offering on time. The good priests were enraged, and later that day one of the lammasu statues who guard the city gates began to crumble. We knew this was a sign that the lammasu spirits had forsaken Odawal, and we left the city and returned to Brahmu.
The Angel of Death began to visit the homes because there were no lammasu to keep it away, and the people grew restless and angry. They asked the Satrap to rebuild the statues, but he ignored them. The Satrap—this is Astelax, who is still Satrap and a man of the Nomarch such as few are these days—said to them, 'You spend your money on rich living rather than on offerings. Spend your money on offerings and the lammasu will return.' This is what he said.
Now Satrap Astelax was building his palace at that time, which was not yet complete. He had sent architects to the Pharaoh's Own City, so that they could model his palace on one of the minor palaces there, the one that rests at the foot of the western hill. Those who despised Astelax saw this and heaped blame upon him for sending his slaves to build his palace instead of rebuilding the statues. When his taxmen came to their doors they called him the Nomarch's lapdog, and asked if he would send the Angel of Death if they did not pay their taxes.
This is how things went that year, until the High Priest and several others declared that Astelax was not fit to rule Odawal. They brought forth Brielsunat, who was once a High Priestess in Wohahat and a distant cousin of the Nomarch, and tried to make her the Satrap. They could not do so, and Astelax expelled them from the city. From there they travelled to Verapadra and stayed there to gather up an army. Then they marched to Odawal, but tricked the Satrap into believing that they would attack the city. His guards were placed all along the outer wall, but they saw no enemy, except for a messenger who came running from the east to tell them that the rebels were marching along the river, destroying the villages and boats as they went. The Satrap was angered and sent his army to destroy the rebellion.
Scenario
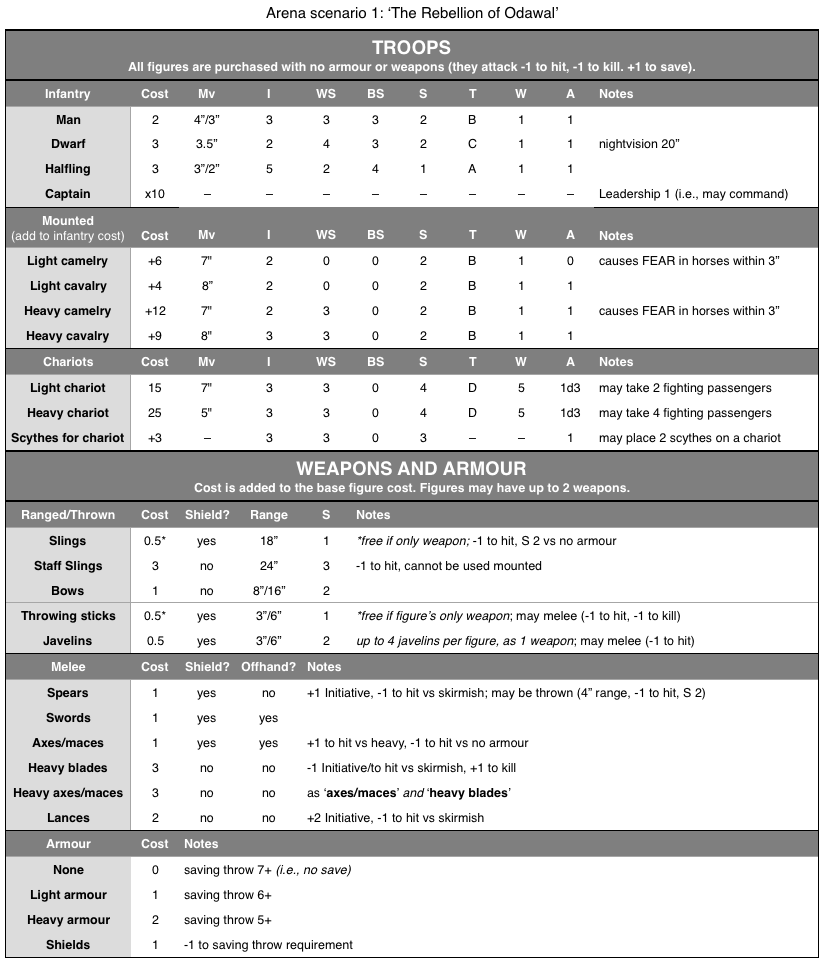
Players can either fight for the Satrap or the Rebellion. The Satrap has 2000 points to spend on building an army, and the Rebels have 1000 points. Only the rebels may purchase dwarves or halflings.
Purchasing units: units can be of any size up to 30 (mounted) or 50 (foot) figures, but large units will have penalties to control:
- Foot: 1-18 figures (Normal), 19-24 figures (Stupid), 25-30 figures (Stupid -1), 31-50 figures (Stupid -2)
- Mounted: 1-12 figures (Normal), 13-18 figures (Stupid), 19-24 figures (Stupid -1), 25-30 figures (Stupid -2)
After you purchase your captains, roll 1D3 and assign that as the LD of any one of your captains. Keep doing that until all of your captains have an LD value.
Starting locations: The Satrap's army will begin in the west, approximately 12 hours' march from the river. The Rebels will begin at some point along the river. The armies will have to scout out and engage the other.
Victory Conditions: The Rebels win if they can destroy three villages, or route the Satrap's army by destroyed one third of its troops. The Satrap's army wins if it can destroy half of the Rebel army's troops. For the purposes of this game, 'Light skirmishers'—foot troops who have no armour, use only free weapons, and are deployed in skirmish order—do not count against the total.
Rules
Posting: I will process turns every Wednesday and Sunday evening, usually between 5pm-9pm (my time, GMT). All turns
must be posted by then, otherwise I will assume based on your instructions that there are no changes to orders, and/or all units will act as independent parties (this means that I'll roll to see what they do in the context of what's happening). At the start of the scenario neither army has spotted each other, so all of our posts will be private. Once two forces have spotted each other, those groups must post publicly in this thread.
Giving Orders: Whenever you issue a direct order, roll 1D6 in the
dice roller and link it to the bottom of the post, with your character's Leadership value (e.g.,
LD 2: [1d6] = 3). In public posts, direct orders to units led by your character or within command range of your character must be posted publicly (this just makes it easier on me). When sending indirect orders—sending a messenger or a signal, talking through crystal ball, whatever— the method of the message must be described publicly, but the actual message can be sent to me privately.
How to Issue Orders:
- In direct contact: roll your LD or the unit captain's LD (1D6, need ≤LD). Pass = OK, Fail = order delayed until next turn.
- Within 6" and with line of sight/hearing: roll the unit captain's LD or your LD-1. Pass = order received, Fail = GM rolls again to see if 1-3) delayed, 4-5) misinterpreted, 6) ignored/unable to comply. The delay may be 1, 2 or even 3 turns. If the unit has no captain, switch 'misinterpreted' and 'ignored'.
- Communicating indirectly (message/signal): when the message arrives, roll as above, except your LD is at -2.
- Yes, you can use subordinate commanders (as in, 'Hey, you! Take this order and go make sure all of those units over there get the message!').
- You can set up a strict chain of command in your roster—for example, make one captain the commanding officer of several other units/captains. That way you can give orders to one captain, who will relay it to those in his command, and so on.
XP Awards: All awards will be in the form of XP that can be given to the player's campaign PCs. The scenario winners will receive XP divided evenly between them, and both armies will receive XP based on the number of army points they destroy or route from the opponent. There will also be 'GM fiat' awards for instances of sportsmanship/taking one for the team, daring actions, and so on.
- Screen Shot 2016-04-04 at 5.45.47 pm.png (150.51 KiB) Viewed 1936 times
