


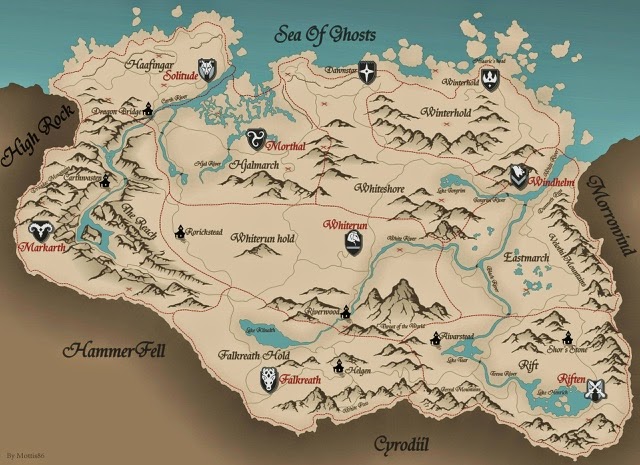
Listed below are the towns and villages of the world of Skyrim.
SOLITUDE
Solitude is the capital city of Skyrim. Currently ruled by Jarl Elisif the Fair, widow of the late High King Torygg, it is the headquarters of the Imperial Legion stationed in Skyrim. Set upon a great stone arch that towers above the mouth of the Karth River, the city is surrounded by the soaring peaks of the nearby mountains.
Skills: Scholar, Cartographer, Commander
Traits: Defender, Honorable
Alignment: Imperial
Haggling: Ob ??
Friends & Enemies: -
Laws: -
Places To Stay: -
Choose where you will stay the night, comparing how much recovery you need against the kind of bill (called Lifestyle) you will rack up. During recovery, you MUST recover conditions in this order: Hungry/Thirsty, Angry, Afraid, Exhausted, Injured, Sick.
Sleep in the gutter (Free!): Curl up under a bridge and hope that violent gangs of teenagers don't beat you for sport.
Can I crash at your place? (Free!): Stay with someone you know, but you have to put up with their shit.
Katla Farm (+1 Lifestyle): Stay here and you can test to Recover from one Condition, except Sick or Injured. For an additional +1 Lifestyle, you can test to hide from your Enemies.
Castle Dour Barracks (+1 Lifestyle): Make one recovery test. For an additional +1 Lifestyle, you can make a second recovery test, except against Sick or Injured.
Proudspire Manor Inn (+2 Lifestyle): Satisfy Hungry/Thirsty. Then make two recovery tests. For an additional +1 Lifestyle, you can make a third recovery test. Recovery tests here are at +1D for Angry, Afraid, and Exhausted.
Blue Palace Hotel (+3 Lifestyle): Satisfy Hungry/Thirsty and Exhuasted. Then make two recovery tests. For an additional +1 Lifestyle, you can make a third and a fourth recovery test. Recovery tests here are at +1D for Sick and Injured.
Things To Do: -
Radiant Raiment Marketplace (Free!): Buy new gear from the marketplace (Max Resource Ob 4).
Winking Skeever Tavern (+1 Lifestyle): Satisfy Hungry/Thirsty, or buy more drinks to test to recover Angry or Afraid.
Listen to Rumors, Tell Tales (Free!): Hang out in the bar and swap stories. The GM will give you some adventuring hooks in exchange for a good yarn.
Hire Help (minimium Level 2; +1 to +3 Lifestyle): Test Circles to find some poor sap to work for you on your next outing. Use the examples below as a guide for hiring henchmen.
Porters help Laborer and cost +1 Lifestyle.
Guards help Fighter and cost +2 Lifestyle.
Guides help Pathfinder and cost +3 Lifestyle.
Search for someone (+1 Lifestyle): Test Circles to track down someone specific, like a king or a wizard.
Visit a relation (Free!): Visit anyone you know personally in this Town.
Dig up leads (+1 Lifestyle): Test Circles to hear legends about a dungeon, person, or creature.
Research (+1 Lifestyle): Test Scholar to discover legends about a dungeon, person, or creature.
Miscellaneous personal business (+1 Lifestyle): A catch-all category. Most Camp activities can be done here as well, such as scribing scrolls.
Use Guild Facilities (+1 Lifestyle): Rent a place to build or repair your gear.
Hire Guild Apprentice (+1 Lifestyle): Test Circles to gain Help on building or repairing your gear while in Town.
Bard's College (+1 Lifestyle): Test Circles and bribe a few people to find work. A good strategy if you have a high Resources rating, but not much actual treasure.
Temple of the Divines, services (Free!): Make a donation, right now, to have a priest cast a prayer on you.
1st Circle Prayer - Resources Ob 3
2nd Circle Prayer - Resources Ob 5
Temple of the Divines, quiet prayer (+1 Lifestyle): Roll 2d6 to get a random boon or curse. Odds are not in your favor. Test Theologian or leave 2D treasure to gain +1 to the roll.
Markarth is located in the far west of Skyrim, in the mountains of The Reach, west of the Karth River. With both main roads cutting through mountains and rugged terrain, traveling to and from Markarth is one of the most treacherous trips for travelers. Most of the city's residents tend to be quite unfriendly to outsiders.
Skills: Armorer, Cartographer, Stonemason
Traits: Cunning, Stoic
Alignment: Unaffiliated
Haggling: Ob ??
Friends & Enemies: -
Laws: -
Places To Stay: -
Choose where you will stay the night, comparing how much recovery you need against the kind of bill (called Lifestyle) you will rack up. During recovery, you MUST recover conditions in this order: Hungry/Thirsty, Angry, Afraid, Exhausted, Injured, Sick.
Sleep in the gutter (Free!): Curl up under a bridge and hope that violent gangs of teenagers don't beat you for sport.
Can I crash at your place? (Free!): Stay with someone you know, but you have to put up with their shit.
The Warrens Flophouse (+1 Lifestyle): Make one recovery test. For an additional +1 Lifestyle, you can make a second recovery test, except against Sick or Injured.
Silver-Blood Inn (+2 Lifestyle): Satisfy Hungry/Thirsty. Then make two recovery tests. For an additional +1 Lifestyle, you can make a third recovery test. Recovery tests here are at +1D for Angry, Afraid, and Exhausted.
Vlindrel Hotel (+3 Lifestyle): Satisfy Hungry/Thirsty and Exhuasted. Then make two recovery tests. For an additional +1 Lifestyle, you can make a third and a fourth recovery test. Recovery tests here are at +1D for Sick and Injured.
Things To Do: -
Arnleif & Sons Trading Company (Free!): Buy new gear from the marketplace (Max Resource Ob 3).
The Hag's Cure Tavern (+1 Lifestyle): Satisfy Hungry/Thirsty, or buy more drinks to test to recover Angry or Afraid.
Listen to Rumors, Tell Tales (Free!): Hang out in the bar and swap stories. The GM will give you some adventuring hooks in exchange for a good yarn.
Hire Help (minimium Level 2; +1 to +3 Lifestyle): Test Circles to find some poor sap to work for you on your next outing. Use the examples below as a guide for hiring henchmen.
Porters help Laborer and cost +1 Lifestyle.
Guards help Fighter and cost +2 Lifestyle.
Guides help Pathfinder and cost +3 Lifestyle.
Search for someone (+1 Lifestyle): Test Circles to track down someone specific, like a king or a wizard.
Visit a relation (Free!): Visit anyone you know personally in this Town.
Dig up leads (+1 Lifestyle): Test Circles to hear legends about a dungeon, person, or creature.
Research (+1 Lifestyle): Test Scholar to discover legends about a dungeon, person, or creature.
Miscellaneous personal business (+1 Lifestyle): A catch-all category. Most Camp activities can be done here as well, such as scribing scrolls.
Use Guild Facilities (+1 Lifestyle): Rent a place to build or repair your gear.
Hire Guild Apprentice (+1 Lifestyle): Test Circles to gain Help on building or repairing your gear while in Town.
Ghorza gra-Bagol (+1 Lifestyle): Test Circles and bribe a few people to find work. A good strategy if you have a high Resources rating, but not much actual treasure.
Riften is a bustling center of commerce located in the beautiful Autumnal Forest region of Skyrim. Despite the fact that the current Jarl in office is Laila Law-Giver, the residents understand that the city is, for all intents and purposes, actually owned and operated by the notorious Thieves Guild in Skyrim.
Skills: Haggler, Rider, Criminal
Traits: Foolhardy, Quick-witted
Alignment: Unaffiliated
Haggling: Ob ??
Friends & Enemies: -
Laws: -
Places To Stay: -
Choose where you will stay the night, comparing how much recovery you need against the kind of bill (called Lifestyle) you will rack up. During recovery, you MUST recover conditions in this order: Hungry/Thirsty, Angry, Afraid, Exhausted, Injured, Sick.
Sleep in the gutter (Free!): Curl up under a bridge and hope that violent gangs of teenagers don't beat you for sport.
Can I crash at your place? (Free!): Stay with someone you know, but you have to put up with their shit.
Haelga's Bunkhouse (+1 Lifestyle): Make one recovery test. For an additional +1 Lifestyle, you can make a second recovery test, except against Sick or Injured.
The Bee & Barb Inn (+2 Lifestyle): Satisfy Hungry/Thirsty. Then make two recovery tests. For an additional +1 Lifestyle, you can make a third recovery test. Recovery tests here are at +1D for Angry, Afraid, and Exhausted.
Things To Do: -
The Pawned Prawn Marketplace (Free!): Buy new gear from the marketplace (Max Resource Ob 3).
The Ragged Flagon Tavern (+1 Lifestyle): Satisfy Hungry/Thirsty, or buy more drinks to test to recover Angry or Afraid.
Listen to Rumors, Tell Tales (Free!): Hang out in the bar and swap stories. The GM will give you some adventuring hooks in exchange for a good yarn.
Hire Help (minimium Level 2; +1 to +3 Lifestyle): Test Circles to find some poor sap to work for you on your next outing. Use the examples below as a guide for hiring henchmen.
Porters help Laborer and cost +1 Lifestyle.
Guards help Fighter and cost +2 Lifestyle.
Guides help Pathfinder and cost +3 Lifestyle.
Search for someone (+1 Lifestyle): Test Circles to track down someone specific, like a king or a wizard.
Visit a relation (Free!): Visit anyone you know personally in this Town.
Dig up leads (+1 Lifestyle): Test Circles to hear legends about a dungeon, person, or creature.
Research (+1 Lifestyle): Test Scholar to discover legends about a dungeon, person, or creature.
Miscellaneous personal business (+1 Lifestyle): A catch-all category. Most Camp activities can be done here as well, such as scribing scrolls.
Use Guild Facilities (+1 Lifestyle): Rent a place to build or repair your gear.
Hire Guild Apprentice (+1 Lifestyle): Test Circles to gain Help on building or repairing your gear while in Town.
Riften Warehouse (+1 Lifestyle): Test Circles and bribe a few people to find work. A good strategy if you have a high Resources rating, but not much actual treasure.
Temple of Mara, services (Free!): Make a donation, right now, to have a priest cast a prayer on you.
1st Circle Prayer - Resources Ob 3
2nd Circle Prayer - Resources Ob 5
Temple of Mara, quiet prayer (+1 Lifestyle): Roll 2d6 to get a random boon or curse. Odds are not in your favor. Test Theologian or leave 2D treasure to gain +1 to the roll.
Winterhold is located in northern Skyrim. Once a great capital rivaling Solitude in power and importance, Winterhold is now little more than a shell of its former self. The College of Winterhold is a guild of mages centered in Skyrim, with Mirabelle Ervine serving as the Master Wizard.
Skills: Alchemist, Lore Master, Scholar
Traits: Thoughtful, Skeptical
Alignment: Imperial
Haggling: Ob ??
Friends & Enemies: -
Laws: -
Places To Stay: -
Choose where you will stay the night, comparing how much recovery you need against the kind of bill (called Lifestyle) you will rack up. During recovery, you MUST recover conditions in this order: Hungry/Thirsty, Angry, Afraid, Exhausted, Injured, Sick.
Sleep in the gutter (Free!): Curl up under a bridge and hope that violent gangs of teenagers don't beat you for sport.
Can I crash at your place? (Free!): Stay with someone you know, but you have to put up with their shit.
Hollyfrost Farm (+1 Lifestyle): Stay here and you can test to Recover from one Condition, except Sick or Injured. For an additional +1 Lifestyle, you can test to hide from your Enemies.
The Frozen Hearth Inn (+2 Lifestyle): Satisfy Hungry/Thirsty. Then make two recovery tests. For an additional +1 Lifestyle, you can make a third recovery test. Recovery tests here are at +1D for Angry, Afraid, and Exhausted.
Things To Do: -
Birna's Oddments Marketplace (Free!): Buy new gear from the marketplace (Max Resource Ob 4).
Search for someone (+1 Lifestyle): Test Circles to track down someone specific, like a king or a wizard.
Visit a relation (Free!): Visit anyone you know personally in this Town.
Dig up leads (+1 Lifestyle): Test Circles to hear legends about a dungeon, person, or creature.
Research (+1 Lifestyle): Test Scholar to discover legends about a dungeon, person, or creature.
Miscellaneous personal business (+1 Lifestyle): A catch-all category. Most Camp activities can be done here as well, such as scribing scrolls.
Use Guild Facilities (+1 Lifestyle): Rent a place to build or repair your gear.
Hire Guild Apprentice (+1 Lifestyle): Test Circles to gain Help on building or repairing your gear while in Town.
College of Winterhold (+1 Lifestyle): Test Circles and bribe a few people to find work. A good strategy if you have a high Resources rating, but not much actual treasure.
Morrowind, formerly known as Resdayn and sometimes called Dunmereth, is an Imperial province adjacent to Skyrim. It is divided into two main parts, the mainland and the island of Vvardenfell. Morrowind is the homeland of the Dunmer, also known as Dark Elves. Morrowind currently is ruled by King Hlaalu Helseth, from the city of Blacklight.
Skills: Healer, Mentor, Pathfinder
Traits: Adventurous, Quiet
Alignment: Imperial
Haggling: Ob ??
Friends & Enemies: -
Laws: -
Places To Stay: -
Choose where you will stay the night, comparing how much recovery you need against the kind of bill (called Lifestyle) you will rack up. During recovery, you MUST recover conditions in this order: Hungry/Thirsty, Angry, Afraid, Exhausted, Injured, Sick.
Sleep in the gutter (Free!): Curl up under a bridge and hope that violent gangs of teenagers don't beat you for sport.
Can I crash at your place? (Free!): Stay with someone you know, but you have to put up with their shit.
The Stable House (+1 Lifestyle): Stay here and you can test to Recover from one Condition, except Sick or Injured. For an additional +1 Lifestyle, you can test to hide from your Enemies.
Ald Skar Inn (+2 Lifestyle): Satisfy Hungry/Thirsty. Then make two recovery tests. For an additional +1 Lifestyle, you can make a third recovery test. Recovery tests here are at +1D for Angry, Afraid, and Exhausted.
Flowers of Gold Hotel (+3 Lifestyle): Satisfy Hungry/Thirsty and Exhuasted. Then make two recovery tests. For an additional +1 Lifestyle, you can make a third and a fourth recovery test. Recovery tests here are at +1D for Sick and Injured.
Things To Do: -
Sethan's Tradehouse (Free!): Buy new gear from the marketplace (Max Resource Ob 5).
Eight Plates Tavern (+1 Lifestyle): Satisfy Hungry/Thirsty, or buy more drinks to test to recover Angry or Afraid.
Listen to Rumors, Tell Tales (Free!): Hang out in the bar and swap stories. The GM will give you some adventuring hooks in exchange for a good yarn.
Hire Help (minimium Level 2; +1 to +3 Lifestyle): Test Circles to find some poor sap to work for you on your next outing. Use the examples below as a guide for hiring henchmen.
Porters help Laborer and cost +1 Lifestyle.
Guards help Fighter and cost +2 Lifestyle.
Guides help Pathfinder and cost +3 Lifestyle.
Search for someone (+1 Lifestyle): Test Circles to track down someone specific, like a king or a wizard.
Visit a relation (Free!): Visit anyone you know personally in this Town.
Dig up leads (+1 Lifestyle): Test Circles to hear legends about a dungeon, person, or creature.
Research (+1 Lifestyle): Test Scholar to discover legends about a dungeon, person, or creature.
Miscellaneous personal business (+1 Lifestyle): A catch-all category. Most Camp activities can be done here as well, such as scribing scrolls.
Whiterun is in the center of the province of Skyrim. In Whiterun, Nords live in the traditional manner: their lives are simple, harsh, and rooted in ancient traditions. The city is sited to have a sheer defensive advantage offered by its position on a large bluff that raises the city above the surrounding tundra.
Skills: Haggler, Steward, Armorer
Traits: Bold, Scarred
Alignment: Nord
Haggling: Ob ??
Friends & Enemies: -
Laws: -
Places To Stay: -
Choose where you will stay the night, comparing how much recovery you need against the kind of bill (called Lifestyle) you will rack up. During recovery, you MUST recover conditions in this order: Hungry/Thirsty, Angry, Afraid, Exhausted, Injured, Sick.
Sleep in the gutter (Free!): Curl up under a bridge and hope that violent gangs of teenagers don't beat you for sport.
Can I crash at your place? (Free!): Stay with someone you know, but you have to put up with their shit.
Whiterun Stables (+1 Lifestyle): Stay here and you can test to Recover from one Condition, except Sick or Injured. For an additional +1 Lifestyle, you can test to hide from your Enemies.
Jorrvaskr Flophouse (+1 Lifestyle): Make one recovery test. For an additional +1 Lifestyle, you can make a second recovery test, except against Sick or Injured.
The Bannered Mare Inn (+2 Lifestyle): Satisfy Hungry/Thirsty. Then make two recovery tests. For an additional +1 Lifestyle, you can make a third recovery test. Recovery tests here are at +1D for Angry, Afraid, and Exhausted.
Dragonsreach Royal Quarters (+3 Lifestyle): Satisfy Hungry/Thirsty and Exhuasted. Then make two recovery tests. For an additional +1 Lifestyle, you can make a third and a fourth recovery test. Recovery tests here are at +1D for Sick and Injured.
Things To Do: -
Belethor's Goods (Free!): Buy new gear from the marketplace (Max Resource Ob 4).
Drunken Huntsman Tavern (+1 Lifestyle): Satisfy Hungry/Thirsty, or buy more drinks to test to recover Angry or Afraid.
Listen to Rumors, Tell Tales (Free!): Hang out in the bar and swap stories. The GM will give you some adventuring hooks in exchange for a good yarn.
Hire Help (minimium Level 2; +1 to +3 Lifestyle): Test Circles to find some poor sap to work for you on your next outing. Use the examples below as a guide for hiring henchmen.
Porters help Laborer and cost +1 Lifestyle.
Guards help Fighter and cost +2 Lifestyle.
Guides help Pathfinder and cost +3 Lifestyle.
Search for someone (+1 Lifestyle): Test Circles to track down someone specific, like a king or a wizard.
Visit a relation (Free!): Visit anyone you know personally in this Town.
Dig up leads (+1 Lifestyle): Test Circles to hear legends about a dungeon, person, or creature.
Research (+1 Lifestyle): Test Scholar to discover legends about a dungeon, person, or creature.
Miscellaneous personal business (+1 Lifestyle): A catch-all category. Most Camp activities can be done here as well, such as scribing scrolls.
Use Guild Facilities (+1 Lifestyle): Rent a place to build or repair your gear.
Hire Guild Apprentice (+1 Lifestyle): Test Circles to gain Help on building or repairing your gear while in Town.
Skyforge Guildhouse (+1 Lifestyle): Test Circles and bribe a few people to find work. A good strategy if you have a high Resources rating, but not much actual treasure.
Hall of the Dead, services (Free!): Make a donation, right now, to have a priest cast a prayer on you.
1st Circle Prayer - Resources Ob 3
2nd Circle Prayer - Resources Ob 5
Hall of the Dead, quiet prayer (+1 Lifestyle): Roll 2d6 to get a random boon or curse. Odds are not in your favor. Test Theologian or leave 2D treasure to gain +1 to the roll.
High Hrothgar is a monastery that sits at the top of the Seven Thousand Steps to the Throat of the World - the highest mountain in the Empire. It is here the ancient Greybeards reside, living in absolute silence to better attune themselves to the voice of the sky.
Skills: Theologian, Lore Master, Scholar
Traits: Thoughtful, Calm
Alignment: Nord
Haggling: Ob ??
Friends & Enemies: -
Laws: -
Places To Stay: -
Choose where you will stay the night, comparing how much recovery you need against the kind of bill (called Lifestyle) you will rack up. During recovery, you MUST recover conditions in this order: Hungry/Thirsty, Angry, Afraid, Exhausted, Injured, Sick.
Sleep in the gutter (Free!): Curl up under a bridge and hope that violent gangs of teenagers don't beat you for sport.
Can I crash at your place? (Free!): Stay with someone you know, but you have to put up with their shit.
Priests' Cells (+1 Lifestyle): Make one recovery test. For an additional +1 Lifestyle, you can make a second recovery test, except against Sick or Injured.
Things To Do: -
Trade with the priests (Free!): Buy new gear from the marketplace (Max Resource Ob 1).
Search for someone (+1 Lifestyle): Test Circles to track down someone specific, like a king or a wizard.
Visit a relation (Free!): Visit anyone you know personally in this Town.
Dig up leads (+1 Lifestyle): Test Circles to hear legends about a dungeon, person, or creature.
Research (+1 Lifestyle): Test Scholar to discover legends about a dungeon, person, or creature.
Miscellaneous personal business (+1 Lifestyle): A catch-all category. Most Camp activities can be done here as well, such as scribing scrolls.
Throat of the World, services (Free!): Make a donation, right now, to have a priest cast a prayer on you.
1st Circle Prayer - Resources Ob 3
2nd Circle Prayer - Resources Ob 5
Throat of the World, quiet prayer (+1 Lifestyle): Roll 2d6 to get a random boon or curse. Odds are not in your favor. Test Theologian or leave 2D treasure to gain +1 to the roll.
DRAGON BRIDGE
This settlement is a small village, but what is most notable is from what it derived its name from?the bridge that arches across the Karth River. When crossing the bridge, a giant statue of a dragon head can be seen in the middle, hence the name.
Skills: Carpenter, Cook, Peasant
Traits: Early Riser, Rough Hands, Stoic
Alignment: Unaffiliated
Haggling: Ob ??
Friends & Enemies: -
Laws: -
Places To Stay: -
Choose where you will stay the night, comparing how much recovery you need against the kind of bill (called Lifestyle) you will rack up. During recovery, you MUST recover conditions in this order: Hungry/Thirsty, Angry, Afraid, Exhausted, Injured, Sick.
Sleep in the gutter (Free!): Curl up under a bridge and hope that violent gangs of teenagers don't beat you for sport.
Can I crash at your place? (Free!): Stay with someone you know, but you have to put up with their shit.
Lylvieve Farms Stables (+1 Lifestyle): Stay here and you can test to Recover from one Condition, except Sick or Injured. For an additional +1 Lifestyle, you can test to hide from your Enemies.
Lumber Camp Flophouse (+1 Lifestyle): Make one recovery test. For an additional +1 Lifestyle, you can make a second recovery test, except against Sick or Injured.
Things To Do: -
Dragon Bridge Market (Free!): Buy new gear from the marketplace (Max Resource Ob 2).
The Four Shields Tavern (+1 Lifestyle): Satisfy Hungry/Thirsty, or buy more drinks to test to recover Angry or Afraid.
Listen to Rumors, Tell Tales (Free!): Hang out in the bar and swap stories. The GM will give you some adventuring hooks in exchange for a good yarn.
Hire Help (minimium Level 2; +1 to +3 Lifestyle): Test Circles to find some poor sap to work for you on your next outing. Use the examples below as a guide for hiring henchmen.
Porters help Laborer and cost +1 Lifestyle.
Guards help Fighter and cost +2 Lifestyle.
Guides help Pathfinder and cost +3 Lifestyle.
Search for someone (+1 Lifestyle): Test Circles to track down someone specific, like a king or a wizard.
Visit a relation (Free!): Visit anyone you know personally in this Town.
Dig up leads (+1 Lifestyle): Test Circles to hear legends about a dungeon, person, or creature.
Research (+1 Lifestyle): Test Scholar to discover legends about a dungeon, person, or creature.
Miscellaneous personal business (+1 Lifestyle): A catch-all category. Most Camp activities can be done here as well, such as scribing scrolls.
Helgen is a thriving town and keep on the southern border of Skyrim. The keep is controlled by the Imperial Legion.
Skills: Rider, Armorer, Peasant
Traits: Early Riser, Rough Hands, Stoic
Alignment: Imperial
Haggling: Ob ??
Friends & Enemies: -
Laws: -
Places To Stay: -
Choose where you will stay the night, comparing how much recovery you need against the kind of bill (called Lifestyle) you will rack up. During recovery, you MUST recover conditions in this order: Hungry/Thirsty, Angry, Afraid, Exhausted, Injured, Sick.
Sleep in the gutter (Free!): Curl up under a bridge and hope that violent gangs of teenagers don't beat you for sport.
Can I crash at your place? (Free!): Stay with someone you know, but you have to put up with their shit.
Windhelm Stables (+1 Lifestyle): Stay here and you can test to Recover from one Condition, except Sick or Injured. For an additional +1 Lifestyle, you can test to hide from your Enemies.
Helgen Keep Barracks (+1 Lifestyle): Make one recovery test. For an additional +1 Lifestyle, you can make a second recovery test, except against Sick or Injured.
Things To Do: -
Helgen Market (Free!): Buy new gear from the marketplace (Max Resource Ob 2).
Half-Moon Mill Tavern (+1 Lifestyle): Satisfy Hungry/Thirsty, or buy more drinks to test to recover Angry or Afraid.
Listen to Rumors, Tell Tales (Free!): Hang out in the bar and swap stories. The GM will give you some adventuring hooks in exchange for a good yarn.
Hire Help (minimium Level 2; +1 to +3 Lifestyle): Test Circles to find some poor sap to work for you on your next outing. Use the examples below as a guide for hiring henchmen.
Porters help Laborer and cost +1 Lifestyle.
Guards help Fighter and cost +2 Lifestyle.
Guides help Pathfinder and cost +3 Lifestyle.
Search for someone (+1 Lifestyle): Test Circles to track down someone specific, like a king or a wizard.
Visit a relation (Free!): Visit anyone you know personally in this Town.
Dig up leads (+1 Lifestyle): Test Circles to hear legends about a dungeon, person, or creature.
Research (+1 Lifestyle): Test Scholar to discover legends about a dungeon, person, or creature.
Miscellaneous personal business (+1 Lifestyle): A catch-all category. Most Camp activities can be done here as well, such as scribing scrolls.
Ivarstead is a small community that serves as a rest stop for pilgrims before they make the journey up the Seven Thousand Steps to High Hrothgar. Citizens are often heard complaining about how they want to leave Ivarstead as there is nothing there.
Skills: Stonemason, Weaver, Peasant
Traits: Early Riser, Rough Hands, Stoic
Alignment: Unaffiliated
Haggling: Ob ??
Friends & Enemies: -
Laws: -
Places To Stay: -
Choose where you will stay the night, comparing how much recovery you need against the kind of bill (called Lifestyle) you will rack up. During recovery, you MUST recover conditions in this order: Hungry/Thirsty, Angry, Afraid, Exhausted, Injured, Sick.
Sleep in the gutter (Free!): Curl up under a bridge and hope that violent gangs of teenagers don't beat you for sport.
Can I crash at your place? (Free!): Stay with someone you know, but you have to put up with their shit.
Fellstar Farm Stables (+1 Lifestyle): Stay here and you can test to Recover from one Condition, except Sick or Injured. For an additional +1 Lifestyle, you can test to hide from your Enemies.
Vilemyr Common Rooms (+1 Lifestyle): Make one recovery test. For an additional +1 Lifestyle, you can make a second recovery test, except against Sick or Injured.
Things To Do: -
Ivarstead Market (Free!): Buy new gear from the marketplace (Max Resource Ob 2).
Black-Briar Meadery (+1 Lifestyle): Satisfy Hungry/Thirsty, or buy more drinks to test to recover Angry or Afraid.
Listen to Rumors, Tell Tales (Free!): Hang out in the bar and swap stories. The GM will give you some adventuring hooks in exchange for a good yarn.
Hire Help (minimium Level 2; +1 to +3 Lifestyle): Test Circles to find some poor sap to work for you on your next outing. Use the examples below as a guide for hiring henchmen.
Porters help Laborer and cost +1 Lifestyle.
Guards help Fighter and cost +2 Lifestyle.
Guides help Pathfinder and cost +3 Lifestyle.
Search for someone (+1 Lifestyle): Test Circles to track down someone specific, like a king or a wizard.
Visit a relation (Free!): Visit anyone you know personally in this Town.
Dig up leads (+1 Lifestyle): Test Circles to hear legends about a dungeon, person, or creature.
Research (+1 Lifestyle): Test Scholar to discover legends about a dungeon, person, or creature.
Miscellaneous personal business (+1 Lifestyle): A catch-all category. Most Camp activities can be done here as well, such as scribing scrolls.
Karthwasten is a community of several families centered around a now defunct silver mine.
Skills: Stonemason, Weaver, Peasant
Traits: Early Riser, Rough Hands, Stoic
Alignment: Unaffiliated
Haggling: Ob ??
Friends & Enemies: -
Laws: -
Places To Stay: -
Choose where you will stay the night, comparing how much recovery you need against the kind of bill (called Lifestyle) you will rack up. During recovery, you MUST recover conditions in this order: Hungry/Thirsty, Angry, Afraid, Exhausted, Injured, Sick.
Sleep in the gutter (Free!): Curl up under a bridge and hope that violent gangs of teenagers don't beat you for sport.
Can I crash at your place? (Free!): Stay with someone you know, but you have to put up with their shit.
Salvius Farm Stables (+1 Lifestyle): Stay here and you can test to Recover from one Condition, except Sick or Injured. For an additional +1 Lifestyle, you can test to hide from your Enemies.
Mine Barracks (+1 Lifestyle): Make one recovery test. For an additional +1 Lifestyle, you can make a second recovery test, except against Sick or Injured.
Things To Do: -
Karthwasten Market (Free!): Buy new gear from the marketplace (Max Resource Ob 2).
Lund's Tavern (+1 Lifestyle): Satisfy Hungry/Thirsty, or buy more drinks to test to recover Angry or Afraid.
Listen to Rumors, Tell Tales (Free!): Hang out in the bar and swap stories. The GM will give you some adventuring hooks in exchange for a good yarn.
Hire Help (minimium Level 2; +1 to +3 Lifestyle): Test Circles to find some poor sap to work for you on your next outing. Use the examples below as a guide for hiring henchmen.
Porters help Laborer and cost +1 Lifestyle.
Guards help Fighter and cost +2 Lifestyle.
Guides help Pathfinder and cost +3 Lifestyle.
Search for someone (+1 Lifestyle): Test Circles to track down someone specific, like a king or a wizard.
Visit a relation (Free!): Visit anyone you know personally in this Town.
Dig up leads (+1 Lifestyle): Test Circles to hear legends about a dungeon, person, or creature.
Research (+1 Lifestyle): Test Scholar to discover legends about a dungeon, person, or creature.
Miscellaneous personal business (+1 Lifestyle): A catch-all category. Most Camp activities can be done here as well, such as scribing scrolls.
Riverwood is a small Nordic village set in a valley, between the White River and the steep mountains. Riverwood was founded by the ancestors of Gerdur and Hod, current residents and owners of the village's lumber mill.
Skills: Sailor, Carpenter, Peasant
Traits: Early Riser, Rough Hands, Stoic
Alignment: Nord
Haggling: Ob ??
Friends & Enemies: -
Laws: -
Places To Stay: -
Choose where you will stay the night, comparing how much recovery you need against the kind of bill (called Lifestyle) you will rack up. During recovery, you MUST recover conditions in this order: Hungry/Thirsty, Angry, Afraid, Exhausted, Injured, Sick.
Sleep in the gutter (Free!): Curl up under a bridge and hope that violent gangs of teenagers don't beat you for sport.
Can I crash at your place? (Free!): Stay with someone you know, but you have to put up with their shit.
Faendal's Farm Stables (+1 Lifestyle): Stay here and you can test to Recover from one Condition, except Sick or Injured. For an additional +1 Lifestyle, you can test to hide from your Enemies.
Sleeping Giant Flophouse (+1 Lifestyle): Make one recovery test. For an additional +1 Lifestyle, you can make a second recovery test, except against Sick or Injured.
Things To Do: -
Riverwood Trader (Free!): Buy new gear from the marketplace (Max Resource Ob 2).
Alvor & Sigrid's Tavern (+1 Lifestyle): Satisfy Hungry/Thirsty, or buy more drinks to test to recover Angry or Afraid.
Listen to Rumors, Tell Tales (Free!): Hang out in the bar and swap stories. The GM will give you some adventuring hooks in exchange for a good yarn.
Hire Help (minimium Level 2; +1 to +3 Lifestyle): Test Circles to find some poor sap to work for you on your next outing. Use the examples below as a guide for hiring henchmen.
Porters help Laborer and cost +1 Lifestyle.
Guards help Fighter and cost +2 Lifestyle.
Guides help Pathfinder and cost +3 Lifestyle.
Search for someone (+1 Lifestyle): Test Circles to track down someone specific, like a king or a wizard.
Visit a relation (Free!): Visit anyone you know personally in this Town.
Dig up leads (+1 Lifestyle): Test Circles to hear legends about a dungeon, person, or creature.
Research (+1 Lifestyle): Test Scholar to discover legends about a dungeon, person, or creature.
Miscellaneous personal business (+1 Lifestyle): A catch-all category. Most Camp activities can be done here as well, such as scribing scrolls.
It is the farthest settlement along the western border near The Reach. The people here are isolated from much of the rest of the province and pride themselves on their self-sufficiency.
Skills: Cook, Hunter, Peasant
Traits: Early Riser, Rough Hands, Stoic
Alignment: Unaffiliated
Haggling: Ob ??
Friends & Enemies: -
Laws: -
Places To Stay: -
Choose where you will stay the night, comparing how much recovery you need against the kind of bill (called Lifestyle) you will rack up. During recovery, you MUST recover conditions in this order: Hungry/Thirsty, Angry, Afraid, Exhausted, Injured, Sick.
Sleep in the gutter (Free!): Curl up under a bridge and hope that violent gangs of teenagers don't beat you for sport.
Can I crash at your place? (Free!): Stay with someone you know, but you have to put up with their shit.
Lemkil's Farmhouse Stables (+1 Lifestyle): Stay here and you can test to Recover from one Condition, except Sick or Injured. For an additional +1 Lifestyle, you can test to hide from your Enemies.
Frostfruit Flophouse (+1 Lifestyle): Make one recovery test. For an additional +1 Lifestyle, you can make a second recovery test, except against Sick or Injured.
Things To Do: -
Rorikstead Market (Free!): Buy new gear from the marketplace (Max Resource Ob 2).
Rorik's Manor Tavern (+1 Lifestyle): Satisfy Hungry/Thirsty, or buy more drinks to test to recover Angry or Afraid.
Listen to Rumors, Tell Tales (Free!): Hang out in the bar and swap stories. The GM will give you some adventuring hooks in exchange for a good yarn.
Hire Help (minimium Level 2; +1 to +3 Lifestyle): Test Circles to find some poor sap to work for you on your next outing. Use the examples below as a guide for hiring henchmen.
Porters help Laborer and cost +1 Lifestyle.
Guards help Fighter and cost +2 Lifestyle.
Guides help Pathfinder and cost +3 Lifestyle.
Search for someone (+1 Lifestyle): Test Circles to track down someone specific, like a king or a wizard.
Visit a relation (Free!): Visit anyone you know personally in this Town.
Dig up leads (+1 Lifestyle): Test Circles to hear legends about a dungeon, person, or creature.
Research (+1 Lifestyle): Test Scholar to discover legends about a dungeon, person, or creature.
Miscellaneous personal business (+1 Lifestyle): A catch-all category. Most Camp activities can be done here as well, such as scribing scrolls.
Shor's Stone is a small village in eastern Skyrim near the Velothi Mountains. It is a community of miners led by the local blacksmith, Filnjar.
Skills: Stonemason, Laborer, Peasant
Traits: Early Riser, Rough Hands, Stoic
Alignment: Unaffiliated
Haggling: Ob ??
Friends & Enemies: -
Laws: -
Places To Stay: -
Choose where you will stay the night, comparing how much recovery you need against the kind of bill (called Lifestyle) you will rack up. During recovery, you MUST recover conditions in this order: Hungry/Thirsty, Angry, Afraid, Exhausted, Injured, Sick.
Sleep in the gutter (Free!): Curl up under a bridge and hope that violent gangs of teenagers don't beat you for sport.
Can I crash at your place? (Free!): Stay with someone you know, but you have to put up with their shit.
Shor Farm Stables (+1 Lifestyle): Stay here and you can test to Recover from one Condition, except Sick or Injured. For an additional +1 Lifestyle, you can test to hide from your Enemies.
Redbelly Mine Barracks (+1 Lifestyle): Make one recovery test. For an additional +1 Lifestyle, you can make a second recovery test, except against Sick or Injured.
Things To Do: -
Shor's Market (Free!): Buy new gear from the marketplace (Max Resource Ob 2).
Finjar's Brewery (+1 Lifestyle): Satisfy Hungry/Thirsty, or buy more drinks to test to recover Angry or Afraid.
Listen to Rumors, Tell Tales (Free!): Hang out in the bar and swap stories. The GM will give you some adventuring hooks in exchange for a good yarn.
Hire Help (minimium Level 2; +1 to +3 Lifestyle): Test Circles to find some poor sap to work for you on your next outing. Use the examples below as a guide for hiring henchmen.
Porters help Laborer and cost +1 Lifestyle.
Guards help Fighter and cost +2 Lifestyle.
Guides help Pathfinder and cost +3 Lifestyle.
Search for someone (+1 Lifestyle): Test Circles to track down someone specific, like a king or a wizard.
Visit a relation (Free!): Visit anyone you know personally in this Town.
Dig up leads (+1 Lifestyle): Test Circles to hear legends about a dungeon, person, or creature.
Research (+1 Lifestyle): Test Scholar to discover legends about a dungeon, person, or creature.
Miscellaneous personal business (+1 Lifestyle): A catch-all category. Most Camp activities can be done here as well, such as scribing scrolls.